Files and Folders
Proper file management is absolutely essential in any profession, whether it's graphic design, photography, office work, or whatever. In the working world, you don't get credit for work that you know you have done, but you lost, or that you submit, but in the wrong format, etc. We're going to play by the same rules here. In this course, you must turn in the correct file in the correct format every time. So we'll start by setting up a folder structure that helps to organize your files.
You should start off by dividing work between two categories:
Ready to Turn In
and
NOT Ready to Turn In
Make a folder for this class, and keep ALL your files in it. Then add subfolders. Here's one example of what your folder structure could look like. Of course, your files may be named differently-this is just an example.
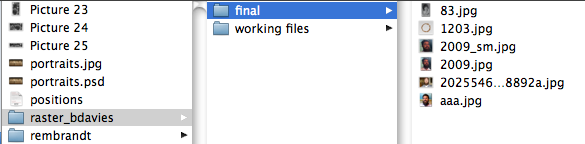
You should create a folder that's ready to accept everything you'll turn in at the end of class. This is called your final folder. This needs to stay very organized, so when I grade things, I know what the project is and who made it. There should never be two versions of a file in the final folder.
In your working files folder, I don't care what you do, because I never have to look at that mess. Organizing this will save you a LOT of headaches, but it's up to you.
When you're working on a project, save it in your "all working files" folder for this class. When you finish work for the session, just save it again. Once you're done you need to make a version that you can turn in. This is called an optimized file, meaning that it has been compressed and flattened so it's easy to open and view on the web or in other programs. The native format file, also called the original, has all your layers, objects, fonts, etc. Unless otherwise stated, you only turn in the optimized version.
Create and save an optimized version of all your projects in the appropriate folder inside your final folder. Adopt uniform naming practices! For instance if you just finished the resume project, and your name is Benjy Davies, it should ONLY be named "resume_bdavies.doc".
Don't name it "Benjy's resume", "my resume", or "resume3". I won't know what it is or who it belongs to!
At the end of every lesson, I will state the EXACT name that you MUST use for the lesson. Any other name, extension, or format will not be accepted.
How to turn in work
Files must be in a universal format. For images, usually you will turn in a .jpg (not a .psd file!). Text documents must be in one of these formats: .doc, .docx. If you do not have Microsoft Word on your computer, GO BUY IT! You can get the whole office suite for about $60, and it will save you a lot of frustration.
After you have saved your file in your final folder, you may turn it in. Go to Finder, then choose Network>My Network>fpains>connect as guest>Connect>mount "gdr" (don't mount fpains). Drag your optimized file from your final folder to the drop box for the class.
Here's what it should look like:
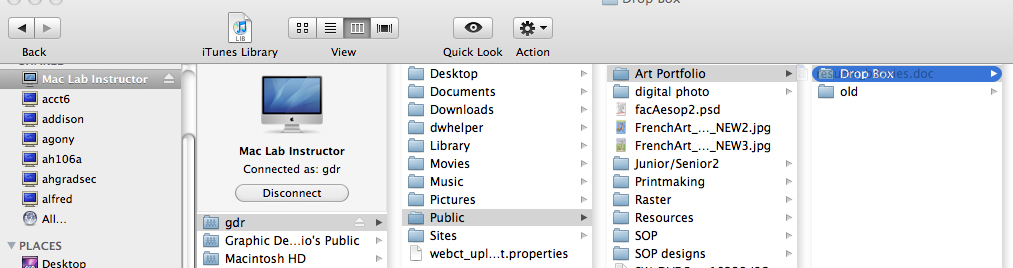
When you do this, you are copying the file to my hard drive, so I can look at it. You still have it in your final folder. If you decide to work on the file some more, you should open up the original file from your working files folder, and make your changes. Then save the changes. Then save for web and replace the optimized file in your final folder and drop it back in my drop box.
You should only have ONE VERSION of each project in your final folder. All the other versions should be in your working files folder.
What you need to do:
Read this page carefully.
Make a folder for this class.
Make subfolders for working files and final files (ready to turn in).
Take a screenshot of your folder structure. (Shift-Command-4 on my mac, then drag)
What you need to turn in:
Save your screenshot as "folder_astudent.jpg", and drop it in my dropbox.
What I will be grading:
You will get credit for completing the project correctly.