Photo Basics
This project will allow you to practice some basic rules of taking pictures. This project will require you to be able to:
Operate your camera in basic shooting modes.
Get pictures off your camera.
Cut and paste pictures together in Photoshop.
Resize and rename pictures.
See several different ways to take a picture of the same subject.
Plan your shots before you take them.
Think about the composition of the photo.
Think in terms of line, shape, texture, etc.
Combine pictures in Photoshop, and add text to them.
Label photos using Bridge to add metadata.
Create an automated web gallery of pictures.
Transfer files from one computer to another through the network.
If you already know all of this, great! You'll just get some practice with composition basic photo guidelines. If a lot of this is confusing to you, don't worry-we'll take it step by step.
There are some good websites about this as well. Use the AWESOME POWER OF GOOGLE!!
The Assignment
Take pictures illustrating some of the basic rules of composition and other formal elements in photography. For some of the rules, you will actually take two pictures. One picture will illustrate how the rule is used well, and the other is how it's ignored. In other words, a good and a bad example of each rule.
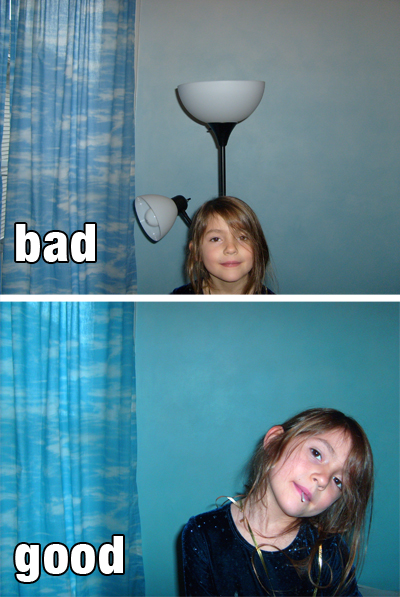
Here's an example of how one rule is shot as a good and a bad example. In the top example, the lamp appears to be growing out of the child's head, the image is washed out and the subject is in the center. In the bottom example, all of these attributes are fixed.
Here are the rules that you will illustrate with both good and bad examples:
Rule of Thirds-Take two pictures of the same subject. In the first, put the subject in the center of the composition. In the second, put the subject about 1/3 of the way in.
Distracting backgrounds-Take two pictures of the same subject. In the first, use a cluttered or distracting background. In the second, use a clean and simple background.
Line-Find naturally-occuring lines in your subject that will direct the eye and add interest. Diagonals imply movement and action. Lines can be fast, slow, or varied. Take two pictures that use line. One picture will use line to draw the eye toward the subject, and the other will not.
Shape-Find a way to make positive and negative space work together. These work best if the negative shape (the shape around the image) is just as interesting as the shape of the subject. Take a picture of a subject that interests you, then take a picture of the same subject using negative space to improve the picture. You may find that cropping a picture will make a big difference here.
Texture-Find ways to bring out the texture of a subject. First take a picture of a subject that you like, then take another picture that brings out the texture. (Hint: direction and intensity of light may help!).
Tone-Take two pictures of the same subject. In the first picture, try to have very flat tones, with little contrast, or washed out. In the second picture, bring out the contrast with different lighting.
Color-Take two different pictures of the same subject. In the first picture, use analagous color, and in the second picture use complementary color.
Shadows-Take two different pictures of the same subject. In the first one, concentrate on the subject, and in the second, concentrate on the shadows. You may need to play with the light for this one.
Point of view-Take two different pictures of the same subject. In the first one, use an "regular" point of view. In the second one, take a really strange point of view.
Framing-Take two different pictures of the same subject. In the first, do not frame the subject. In the second, use a natural frame to focus attention on the subject.
You may find it useful to print this sheet, and take it with you while you're out taking pictures. You do not need an expensive camera for this assignment. Any digital camera with at least 5 megapixels will do.
These are ten common "rules" of photography. Of course there are many other rules and guidelines as well. And of course, there are times when it's good to break the rules, so don't feel like this is only way to take pictures--we're just getting started.
You will probably have to take a lot more than twenty pictures to get all of these examples, so don't worry if you end up with 100 pictures to sort through. When you've got all your shots, put them in a folder, and use Photoshop to paste them together, either side-by-side or top and bottom, and put text on them to indicate "good and bad" or "analagous" and "complementary".
Use Bridge to add metadata, and make an automated web gallery of your finished pictures. Name the folder that contains the finished website PhotoBasics_astudent and drop the folder in my drop box.
All of this "tech" stuff will be demonstrated in class.