Camera Basics
This assignment has many parts. Some of these shots can only be captured with an SLR camera, but some can be taken with a point and shoot model. You should take the time to play with the buttons and RTFM!!!
We will discuss all the required information in class, especially the relationship between the shutter speed, sensitivity(ISO), and aperture. We will also cover the operation of the camera itself. THIS IS A LOT OF INFORMATION!! You will need to study on your own as well, if you hope to understand all of this. The two sites below offer a good overview.
Now all of this stuff below should make some sense.
Drawing with light...
The word photography comes from the Greek words "phos" meaning light, and "graphis" meaning paintbrush or stylus(drawing tool). So photography literally means "drawing with light". The lenses focus the light, but how much light is captured in a camera is almost entirely dependent on three main factors, and they are all dependent on one another. If you change one, you have to change the others to get the right exposure. This relationship is called "exposure marriage". Think of it as a three legged stool--they all work together. The three factors are as follows.
Aperture--The size of the hole that light comes into the camera.
Shutter Speed--How long the hole is open.
Film Speed--How sensitive the fim (or sensor) is to light.
We'll look at each individually, then discuss their relationships.
Aperture
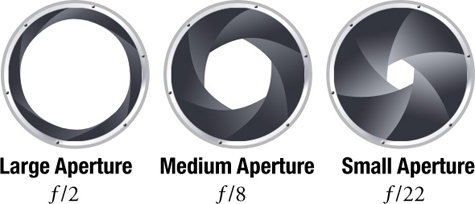
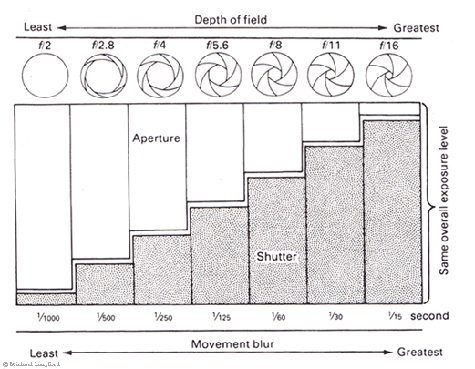
Aperture is measured in something called "f-stops". You don't really need to know why, but you do need to know that a bigger f-stop means the hole is smaller. So f2.8 is a much bigger hole than f22. How does this affect the exposure? If you think of the aperture as a hole in a bucket, and the light as water dripping out, you can see that the water drips out much faster through a bigger hole. In a camera, this means that a larger aperture (smaller number) means that the light gets in faster.
For Aperture, a bigger number means a smaller hole, and less light.
When you change the aperture, you also change the depth of field-how far into the distance things can be focused. Here's a great article that explains depth of field. When we look with our seeholes, we don't notice the problem of depth of field, because our eyes are constantly moving, and our brain "averages" the focus for us. Here's a great example of how the image looks with different depths of field:
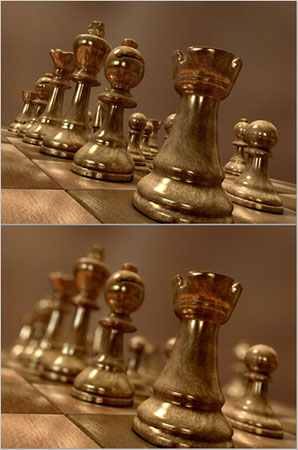
Remember: a smaller hole means a deeper depth of field.
Shutter Speed

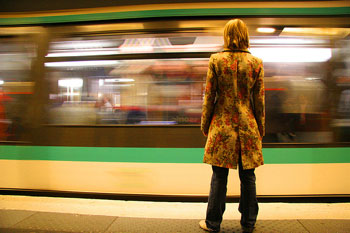
Shutter speed is measured in fractions of a second. 1/250 means that the shutter was only open for one two-hundred and fiftieth of a second. That's fast. A lot faster than 1/30, which is open for one thirtieth of a second. So with shutter speed, the bigger the denominator (the bottom number of a fraction), the shorter the time is that the hole is open. If the shutter is open for a very long time, like an entire second, there's a lot more time for the light to get in and expose the sensor.
For Shutter Speed, a bigger number means more light is captured, but remember, this is fraction, so 1/250 is smaller than 1/30.
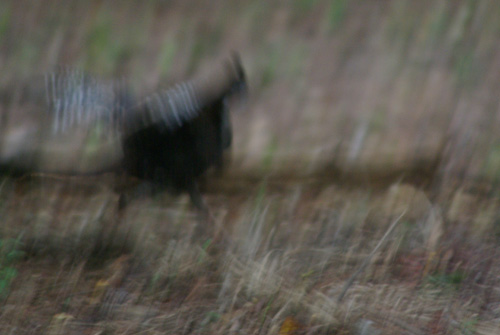
A really slow shutter speed will allow you to take pictures with less light, but if you don't hold really still, things will be blurry. A fast shutter speed will "stop" motion, but you need a lot of light out there, or a really big hole, because the hole isn't open for long. This can lead to some neat photographs like this:
...and some not-so-cool pictures, like this:
Film Speed

Film speed is measured in numbers referred to as ISO or ASA numbers. A film speed of ISO 100 means the film (or sensor) is not very sensitive, and will need a lot of light to be properly exposed. A film speed of 1600 is very sensitive, and needs very little light. So the bigger number means more sensitive.
For Film Speed (ISO) a bigger number means more light is captured.
Since a film speed of 1600 captures more light, why don't we use it all the time? Because the faster the film speed, the more grainy the image. This is usually called "noise" in digital photo, and it looks like flecks of wrongly colored pixels are scattered all over your picture.

The Balance between film speed, aperture and shutter speed.
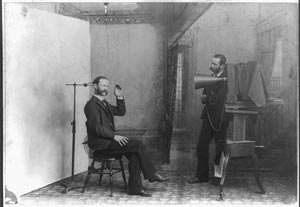
What you would like to do to get the best possible image is shoot with the lowest film speed (ISO) that you can get away with, and still get enough light, by adjusting all three factors. If you want a lot of depth of field and you don't want any noise, and there's not a lot of light to work with, you'll have to go with a really long exposure, which means both the camera and the subject will have to hold still, which means you need a tripod and a patient subject, like this.
In this lesson, you will be experimenting with these settings to get different effects. But even with a point-and-shoot camera, you have a lot of flexibility. Most cameras have an "auto" setting which works pretty well. You can set the flash to on or off, and the camera picks the best combination of settings for you. There are usually a number of other settings as well, including the settings that allow for faster shutter speeds, deliberate overexposure, less depth of field, etc.
Look through your cameras menu and see if you can figure out what some of these are. You will also find settings for turning on and off sounds, time stamps, etc, and the following:
File Size
Your camera has a maximum number of pixels that it can capture, usually measured in megapixels. High end cameras go up to 12 or 14 Megapixels, and the cheap ones are about 8 Megapixels. For most purposes, this is more than you need. If the images are only going to go on the web, one or two Megapixels is plenty.
You can set your camera to sample the files down to a smaller size, but they are always being captured at the same size. The camera is using its software to shrink them before saving them on your card.
You can also set the amount of compression that occurs when making the jpegs. This setting looks like a set of steps sometimes (lots of compression), or a quarter of a pie (less compression).
If you have a SLR, you can also shoot in RAW, or uncompressed format, with no compression.
White Balance
Not all whites are the same. PAS cameras set this automatically, but you can usually change it as well. SLRs do the same. (and if you shoot in RAW, you can change the white balance later!)
Focal Length
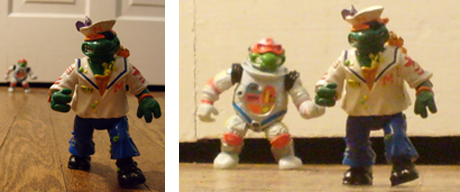
Focal length has a lot to do with the sense of space in your pictures. For instance, in the two pictures below, the turtles didn't move. In image on the left, the camera was zoomed out, and the photographer was very close to the front turtle. In the image on the right, the camera was zoomed in, and the photograper was farther away from the turtles. The distance between the turtles did not change.
RAW format
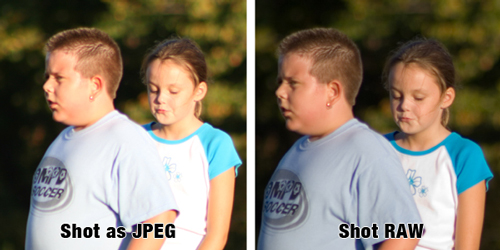
RAW format and other "digital negative" formats are a way to capture the image before your camera's computer has processed it. Most of the time, your camera is adjusting white balance, color, saturation, levels, sharpening, etc., without you doing a thing. Then it compresses the file into a jpeg and saves it on the SD card. A lot of information is lost when you do that.
RAW images are simply the pixel data that the camera captures BEFORE it's been processed. The user can make adjustments in Photoshop or other editing software, and no data is lost. Many cameras can shoot RAW and JPEG simultaneously. The images below were captured this way. You can see that in the image on the left, a lot of the light areas are "blown out". This was in the processing, rather than in the capture, as you can see in the image on the right, which has much smoother transitions.
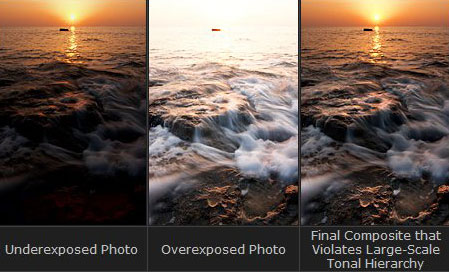
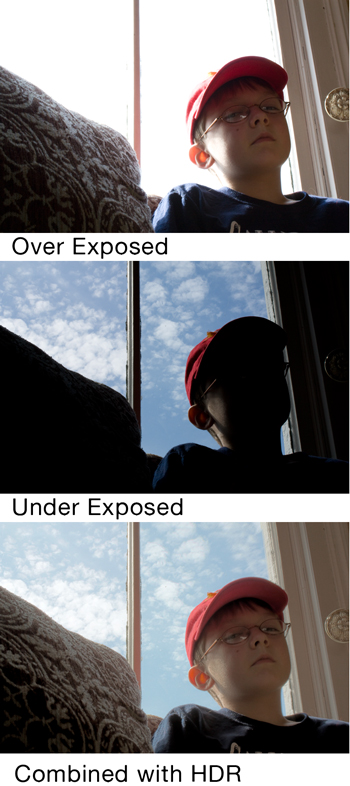
HDR (High Dynamic Range)
Because every exposure has to be created according to the available light, in certain situations, you must compromise to capture either the darks or lights, because you can't get them all. With HDR techniques, you can combine exposures so that your capture of the darks and the capture of the lights are combined into a single image that has a wider range of tones than is possible with a single exposure, as seen in the examples below.
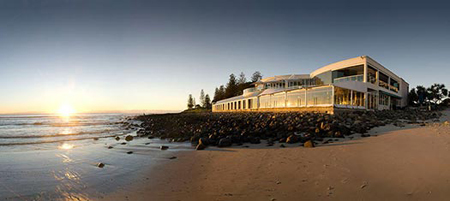
Photomerge
Photoshop (and even some cameras) will "stitch" images together to make long panoramas like the image below.
Here's another example, using 15 pictures, and creating a 360° view of my office. You'll have to scroll left and right, but you'll see the thermos is on both sides of the image.
Assignments
Create your own examples of each of the following, and make a web gallery of them.
Depth of Field: Create two photos of the same subject that demonstrate your ability to control depth of field.
In the first picture, use a very shallow depth of field.
In the second picture, use a long depth of field.
Paste them together, like the pictures of the chess pieces above. Add data about the exposure. Example.
Shutter Speed: Create three images that demonstrate your ability to use variable shutter speeds. You'll end up with three images for this assignment.
In the first picture, use a very long exposure to create an abstract or distorted image. Here are some good examples of long exposure images. This may be easier to do at night.
In the second picture, move the camera to follow a moving subject, so the subject stays in focus, but the background blurs. This is called "panning". Here are some tips for panning. Try not to get run over. The idea is to have the camera and the subject moving at the same speed, and the background not moving. There are a variety of approachs to this problem. In Example One, the photographer was in a car, and the rearview mirror is moving at the same rate ('cause it's attached to the car!). In Example Two, the girl on the bike was riding at a fixed rate, and the camera was panned (moved from side to side) in sync with the bike, more or less.
The third picture is also a composite. On the left side, use a really fast shutter speed (and a lot of light!-maybe with a flash) to take a picture that captures an object in motion. On the right side, take the same picture, but with a slower shutter, so you can see the difference. Example.
Do not paste these together.
Focal Length: Take two pictures that demonstrate how focal length affects the space in the picture, like the turtles above. Paste them together as one image.
White Balance: Take two pictures of the same scene using different white balance settings. Paste them up side by side. Add information about the different white balances selected. Example
RAW: Using a camera that can shoot RAW, take some RAW photos and manipulate them in the RAW editor to make a great picture. Paste it up side by side with the same photo shot in jpeg format for comparison. It should look something like the example above.
HDR Use Photoshop's HDR capabilities to make a good photograph with HDR. You will need to use a minimum of three different exposures to get the range correct. Merge the three images, adjust the tones, and convert the 32-bit image to an 8 bit file. Paste it up side by side with the same photo in "regular" dynamic range. It should look something like the examples above.
Photomerge Use Photoshop (or your camera's software) to make a long skinny panorama photo.
Three More: Make three more side-by-side comparisons that explore some of the settings on your camera. (not the filters, like the sepia tone, black and white, etc.) If you have macro lenses or telephoto lenses, make some side by sides with those, or just use the "tulip" setting.
Macro example Shows how much closer you can get with a macro lens
Noise ExampleShows the appearence of noise in a high ISO.
Double Image Example
This picture was taken with a single exposure. In a dark room, the girls stood in the middle, and the shutter was opened for 8 seconds. A flashlight was used to provide light on the boy for two seconds, than turned off. The boy ran to the other side of the girls, the flash light came on for two more seconds, and was turned off again. This image was taken with cheap point and shoot camera, and the image was not altered in Photoshop in any way.
Beach/Snow Setting Example Here's a couple of shots that show the difference in how my camera sets exposure in "auto" and "beach" setting.
Exposure/Bracketing Examples Here are four shots that show "bracketing", which is the process of adjusting exposures over and under the optimum to get the correct levels.
Exposures vs Adjustment Examples Here are two images that show how an underexposed image can be adjusted to be close to a correct exposure using the Levels adjustment.
You will have to read your camera's manual to determine how to set the various buttons to get all of these different exposures. It might be helpful to first read over this guide to "scenes'.
When you have all of these files, put them in a folder. Add metadata, and make an automated web gallery. Call the folder CameraBasics_astudent
The university owns several nice SLR cameras that you can borrow. See your instructor if you wish to borrow one.